Pages

Saturday 30 October 2010

foiling and flocking; print workshop notes.

  
FOIL/FLOCK PRINTING

This technique enables the application of metallic and patterned foils to the surface of fabric to produce a reflective mirror-like appearance.  The process uses a special, colorless ready mixed adhesive which is applied to the surface of the cloth by screen printing or hand painting.  Once with the hair dryer. Once dry, apply the foil to the surface of the cloth so that the dull side of the foil is resting on the dried adhesive.  The shiny side will be facing upwards.

Heat press or iron to bond the two together.  The fabric is allowed to cool before removing the foils backing film.  Where the printed adhesive is present the foil will have bonded.

ADHESIVES

METATRAN FOIL ADHESIVE
widely used and results in consistent opaque foil printing on all surfaces.  Excellent for large scale work and long printing runs.  However this is a solvent based ink and all equipment needs to be washed in solvent based universal screen wash in a ventilated area.  Bake adhesive dry at 170C for 2 – 5 minutes before foiling.

WATER BASED FOIL ADHESIVE gives superb results and is cleaner to use.  Its greatest advantage is that the adhesive dry’s quickly on the fabric and being water based it is easy to wash all equipment.  Because of its quick drying qualities, care must be taken to wash the adhesive from the screen before it dry’s and clogs the mesh.  Bake dry at 170C for 1-3 minutes before foiling.

PLASTISOL INKS an alternative way of adhering foil to fabric that offers a great range of possibilities.  Plastisol ink are solvent based and therefore are used in the same way as metatran adhesive.  The previous two adhesives will dry transparent so the main reason for using plastisol inks as an adhesive is that they offer the chance of having a coloured base for the foils to bond to.  This proves useful when you require only certain areas of a printed image to be foiled.

Solvent based plastisol inks that will work as adhesives for foil printing – Texopaque, plastofab glitters, Crystalina, blue flash and glow in the dark inks.  Wonderful results can be achieved on these adhesives where the foil is bonded for only a few seconds.  Because such a short amount of time is used the foil will have only fixed in a few areas, giving a textured look.  Even greater results are achieved when this technique is repeated again and again with different coloured foils, producing a multi-layered effect.  This exciting technique can also be tried with the other adhesives.

Bake the plastisol inks dry 170C, 2-5 minutes before foiling.

FOILS

METATRAN METALLIC FOILS super reflective foils, very easy to use and compatible with all of the adhesives.

Textured results heat press or iron for 5 – 15 seconds, 180C.
Opaque results heat press or iron for 45 seconds, 180C.
Let the fabric cool before removing backing film.


METHOD OF PRINTING WITH FOILS

1.    Take the require adhesive and run it in a line down one side of the screen printing frame.
2.    Screen print or hand paint the adhesive onto the fabric.  Wash the screen immediately if using water based adhesive to avoid blockage, if using solvent based ink was with screen wash.
3.    Bake the adhesive for 2 – 5 minutes.
4.    Cut a section, or sections of foils big enough to cover the printed area.
5.    Lay the foil, or foils onto the printed area of the cloth.  This should be so the metallic, shiny side faces upwards.


6.    Smooth the foil over the fabric, cover it with plain sheet of newsprint or fabric and après firmly with a hot iron.  For best results, heat press for 45 seconds, 180C.
7.    Allow the fabric to cool before removing the backing film.  Where the adhesive was printed the foil will have bonded with the fabric.
8.    Save the backing film as the foil remaining can be reused.
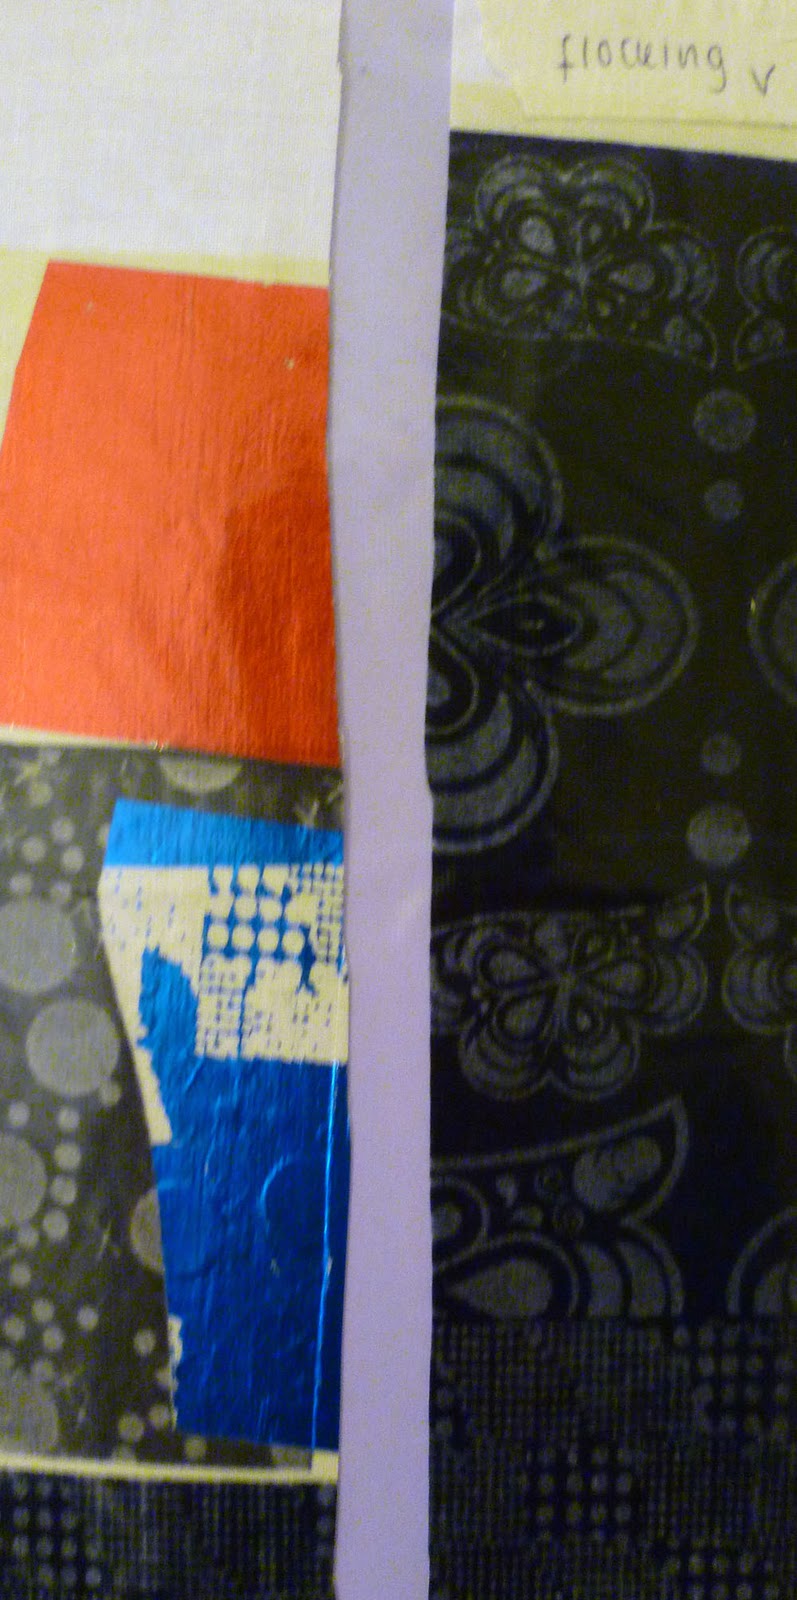
FLOCKING

Flock print/transfer system is a heat transfer method performed by applying the flock paper onto a hot melt adhesive.  Flock papers come in a wide variety of colours, 0.5mm viscose coloured fabrics fixed on paper support.  Flock printing leaves a short piled texture on the surface of fabric, similar to velvet.  A technique which is much the same as foil printing is used but the adhesive required is a specially produced flock adhesive.

Print or hand paint the flocking adhesive, bake dry before applying the flocking paper.  Put the flocking paper upside down onto the dried adhesive.  Heat press for 15-20 seconds, 180C.  Peel off while warm, where the adhesive was printed the short pile of the flocking will of bonded.  Wash the screen off with water.

Flocking adhesive will also bond foils, so foils and flocking can be collaged together, however care must be taken not to reheat press on to the surface of the printed flock as it will melt.

MAGICUT TRANSFER PAPER

Specially coated release paper used in conjunction with cutter/plotter machines, for transferring text, logos and designs onto dark fabrics.  Unfortunately we have no cutter/plotter machine so instead images and shapes can be cut out by hand.

Position the cut out shape, ink side down on top of the fabric.  If using text the image should read correctly when viewed from above.  Press for 10 seconds, 180C, allow to cool before peeling off backing paper.  The resulting image will have a matt look and a rubbery feel.

LAMINATING FILM

A transparent film with adhesive on one side, when ironed or heat pressed will adhere to any surface.  Excellent for encasing glitters, sequins, foils and so on.

Friday 29 October 2010

drawing notes.

ways to improve drawing and explore different ways of drawing;
- continuous line
- collage
- different papers
-positive/negative space
- photography
-mixed media
- cut outs
- shapes
- patterns
- shadows
- paintings; watercolours, acrylic, gouache etc
- maps
- feet
-night time; lights
- bold blocks of colour
- surfaces
- 3D
- doodles
- impressions
- scan
-photocopy
-manipulate digitally
- change scale; close ups.
-vary the weights of line

i must describe, document and analyse what i see.

Wednesday 27 October 2010

natural dyes; print workshop notes.

 madder (wool) - weld (wool & cotton) - woad (wool & cotton)


today we had a print seminar on natural dyes. the sustainable way to dye your fabric as it is not harmful to the environment and doesn't use up resources.

http://www.pioneerthinking.com/naturaldyes.html

Instructions for dyeing with woad/indigo pigment;   

5 l water in a stainless steel saucepan/bowl (the dyebath)
add 15g washing soda and stir

add 10g indigo/woad pigment to a little warm water and stir into smooth paste and add to dyebath

add 5g hydrosulphite (hydros) or colour run remover sprinkled gently over the dyebath
stir gently and LEAVE!!

heat gently to max 50°C for 30 – 45 minutes

when liquid has become a yellowy green colour with a bluey purply film on the surface, the dyebath is ready!!

Slowly dip yarns/cloth into dyestuff – be careful not to let air bubbles form

Leave submersed in the dye for about 10-15 minutes
Remove carefully and leave to oxidise for the same amount of time.
Second and subsequent dips – leave for a shorter time
Eg. Dip for 10 oxidise for 10 minutes etc…
Build up colour this way.
Rinse under rapidly running cool water
Add a teaspoon of vinegar to the final rinse

Air dry and always wash separately

MORDANTING

Basic mordant recipe for all fibres

Use 10% alum to weight of fibres (dry)
For example:

100g of fabric to dye
use 10g of alum (2 teaspoons)

Dissolve alum in approx 100ml boiling water, stirring well until completely dissolved
Add to cool water in a pot and stir well
Add wetted fibres ensuring they are well covered (add more water if necessary)
Put on the lid and bring slowly up to simmer (88ºC)
Keep at this temperature for 1 hour, stirring gently occasionally
Leave the fibres to cool in the solution, overnight if possible
Remove and rinse well before adding to dyebath

Note: at this stage you could dry the fibres and keep for dyeing later
You can also store the solution for re-use again later (large fabric conditioner bottles or catering buckets with lids are ideal for this!)

Most of the natural dyes we have in the Dye Kitchen can be used in the following way:

1.    Weigh the fibres to be dyed
2.    Work out how much dyestuff you need ( 50-100%) of dry fibre weight
3.    Weigh out the dyestuff carefully and rinse in a colander
4.    Add to a pan of water and bring up to simmer (88º) for 45 minutes.
5.    Strain the liquid into a container and allow to cool
6.    You can repeat this step with the dyestuff several times as long as you can get colour out of it…
7.    Place cooled dyestuff into a saucepan and heat
8.    add wetted, pre-mordanted fibres and enough water to cover
9.    heat slowly to simmering point , simmer 30-45 minutes, stirring from time to time
10.    turn off heat and allow fibres to cool in the dyebath if possible
11.    remove and rinse well until water runs clear
12.    wash in warm water with eco-friendly soap
13.    rinse and air dry

Quick dye method:

Put the dyestuff in a muslin bundle or popsock (natural colour)
Rinse under cold water and put into the dyebath
Add water to dyebath, enough to cover fibres
Add pre-mordanted, wetted fibres
Bring up to simmer for 45 minutes, stir occasionally
Rinse
Wash
Dry...

Sunday 24 October 2010

protein fabrics and acid dyes; print workshop notes.

 silk habotai (acid dye) - silk habotai (acid dye) - wool delaine (acid dye)


Printing Silk with Acid Dyes

Before starting make sure you have weighed your fabric DRY and your fabric is scoured and wetted out prepared for dyeing.

When dyeing or printing with Acid dyes, silk retains all its unique properties of lustre softness and handle.
If printing dischargeable acid dye make sure that your background colour is dischargeable.

Recipe:

20-40g Acid Dye
40g Glyezin BC (Increases soluability of dye)
50g Urea
340g Boiling Water
500g Thicker, Manutex 20g
Ammonium Sulphate (fixer)

All powdered dyes must be weighed and prepared in the vacuum unit

Method


Paste the dye with warm water
Add urea and paste again. Add 300g of boiling water and stir until the the dye is fully dissolved. Allow to cool.
Make up 500gs of thickener by weighing 50g of Manutex RS and sprinkling in 500g of cold water while stirring. An electric mixer gives a consistent result. The paste should then be left 30 mins before using.
Add the dye while stirring in at a high speed Dissolve 20g of Aluminium Sulphate and stir to produce a standard print paste. Then:

Print--------Dry (avoiding excessive heat)----------Steam (30-45mins)----------Wash Off

The delicare nature of silk demands a mild wash off in a detergent such as Metapex.

Friday 22 October 2010

castle museum.

'castle museum' visual research project. ba1. project 1b.


Norwich Castle Museum Study Visit
The Decorative Arts Gallery Collections

During week one your job is to visually explore and investigate and become familiar with the objects in the decorative arts collections.
During week two your job will be to research an object or a collection of objects and continue to make drawings of your chosen objects. There will be an object surgery on Monday 25th October/drawing tutorials.
During week three you will be required to bring your ideas together into 3 finished drawings/designs around a collection. Details about this will be discussed at a later time.

YOUR JOB IS TO:

Spend time in the gallery and become familiar with the broad range of objects on display
Read the information provided – note dates, any stories/narratives, political references, historical and social references to pattern, design, maker.  This will help you to begin to identify what interests you about the object or collection of objects and provide you with initial information for research.

YOUR JOB IS TO:

Investigate/Enquire.
Look.
See.
Record and document visually (drawing) and in writing (note taking)
Put in place strategies to help you LOOK, SEE, ENQUIRE, INVESTIGATE – viewfinders, ant, butterfly etc.
Make rules – 5/10 minute drawings, drawing in continuous line, etc

When making your drawings you need to consider:

Composition - working along an edge, across an edge/page, mask areas off etc.
Application of colour- linear, block, textural etc.
Shadows - light/dark
Tracings.
Scale – Miniature, large scale etc
Record detail of object, shapes, negatives/positives, textures/smooth, etc.
we will only know the final outcome a week before hand in, so we don't limit our creativity to the final piece.

i have chosen the delftware china and tiles.

Thursday 21 October 2010

disperse dyes; print workshop notes.

 polyester chiffon - polyester glacier - acetate satin


TRANSFER PRINTING OF DISPERSE DYES ON TO POLYESTER


BACKGROUND INFORMATION

•    This method of dry heat transfer of disperse dyes from a paper onto a synthetic fibre was invented in France and developed in Switzerland in the 1960’s.

•    Transfer Printing or Sublistatic Printing as it is referred to, relies on the ability of selected DISPERSE DYES to sublime when heated, which means they are then able to transfer directly from a paper to a textile fabric.

•    Disperse dyes are the only type of dye which are capable of subliming at workable temperatures and can be transferred onto synthetic fibres such as polyester,dicel, tricel, nylon and acrylic.  (in practice, polyester is by far the most widely used fabric).

•    Advantages of the transfer printing process include:
(1)    Once the dye has been heat transferred onto the synthetic fabric and given a cool machine wash, the dyes remain colour fast.
(2)    After the Transfer Printing Process and washing to remove any unfixed residues, there is no stiffness imported to the fabric and it will remain as supple as before transfer printing.

•    Disperse dyes are supplied in concentrated powder form and when these are sprinkled onto tepid water they can be used as a water colour to paint the paper, or alternatively, the disperse dyes in water can be mixed with a thickener to produce a thicker consistency for better line definition (see overleaf for recipe details).

•    Disperse dye solutions can be painted directly onto objects such as dried leaves.  After drying the leaves, they are placed face down on the synthetic fabric and the leaf is ironed after placing a paper over the top.

TRANSFER PRINTING OF DISPERSE DYES

Although Transfer Printing was developed for polyester, the method can be used to transfer the dyes onto a range of synthetic fabrics at varying temperatures.

CONTACT HEAT OR IRONING TEMPERATURE
POLYESTER                    100-230⁰C for 30 seconds
NYLON                    190-210⁰C for 30 seconds
CELLULOSE ACETATE (Dicel)        190-200⁰C for 20 seconds
CELLULOSE TRIACETATE (Tricel)    190-210⁰C for 30 seconds


RECIPE

Transfer Printing dyes can either be applied to the transfer paper as a ‘water thin’ colour paint or, alternatively, can be mixed with a thickener to produce an ‘oil paint’ consistency for better line definition.

FOR ‘WATER THIN’ CONSISTENCY
10-100gms Disperse Dye is sprinkled onto 500mls of tepid water, stirred thoroughly and left for 5 minutes (10gms for pale colours, 100gms for very strong colours).

FOR ‘OIL  PAINT’ CONSISTENCY
The above ‘WATER THIN’ dye is stirred into 550 gms of previously made up INDALCA PA3R STOCK PASTE*  *[Indalca PA3R stock paste made up as follows: 50gms Indalca PA3R powder is slowly added to 500mls of cold water with high speed stirring].

METHOD

•    The transfer dye solution of either ‘water paint’ or ‘oil paint’ consistency is painted onto a suitable paper, remembering that any painted design will be inversed when it is transferred onto the synthetic fabric e.g. TOM will become MOT
•    Note well:  When the transfer print solutions are made up and even when painted onto the paper, the colours will appear dull and uninteresting.  It is only when they are transferred onto the fabric that they develop their true vibrant colours.
•    It is possible to dye a background colour tint onto the polyester before carrying out the Transfer Printing operation
•    The paper should be thoroughly dried before heat transferring the dyes from the paper onto the fabric by ironing or by using a contact heat press.

CHOICE OF PAPER

•    When painting or printing the dyes onto paper, ‘cockling’ may occur and this will persist until the paper is almost dry.  The thinner the paper the more cockling occurs. Brown paper is effective when the dye is applied to the shiney less absorbant side.
•    80-100gms per sq. metre papers perform better than the lighter weight 50-60gms per sq. metre papers, but it is important not to select too thick a paper as this will inhibit heat transfer of the dyes.
•    To dry the paper more rapidly a hair dryer can be used.


DYEING POLYESTER AND OTHER SYNTHETICS WITH DISPERSE DYES.

Disperse dyes were developed more than seventy years ago for the dyeing of secondary cellulose acetate now known as acetate satin. Since then Disperse dyes have been developed for the dyeing of Nylon and Cellulose Triacetate and most recently, Terylene the ICI brand name for Polyester. Monofilament, plastics and associated yarn, as well as fabric, can be dyed with these dye stuffs.

DYEING RECIPE

Scour the fabric to prepare the cloth before dyeing

Using DISPERSING AGENT WS in the dye bath prevents the disperse dye particles sticking together and creating flecks of colour on the fabric. Disperse dyes do not need a fixing agent in the recipe although Calgon can be added in hard water areas.

For 100grms of DRY fabric we will need 3 litres of water.

For a pale shade use 0.2-0.4 grms dye and 3grms Dispersing agent

For a medium shade use 0.5-1.0 grms dye and 3grms Dispersing agent

For a dark shade use 1.5-2.0 grms dye and 3grms Dispersing agent

Health and Safety: Always mix powdered dye in the vacuum cabinet and wear gloves/apron

METHOD

Measure out the water in a stainless steel pan.

Weigh out the dye and sprinkle on to tepid water. Stir well to dissolve the dye

Measure the Dispersing Agent WS add to the dye bath and stir

Add the fabric and stir gently while raising the temperature to 95-100 degrees. Continue to dye at this temperature for 15-30 mins depending on the shade required.

Complete the process by washing out the fabric in tepid water, spin dry and iron.

Wednesday 20 October 2010

inks and binders; print workshop notes.

INK AND BINDERS

PUFF BINDER

Puff binder produces both raised areas and puckered effects with the application of heat.  Puff binder can be used on its own for neutral colours or mixed with pigment dyes for producing multi-coloured 3D prints.  For optimum effect, heat-set immediately after printing by placing the fabric under the heat press in its open position for few minutes which simultaneously raised and fixes the print.  Alternatively once the print is dry it can be ironed on the underside of the cloth using gentle pressure.

Super blobby puffed effects can be achieved by thickly hand painting the puff binder onto the fabric and heat setting by a hair dryer on its hottest setting.  This will require patience concentrating on one area at a time.  The results are worth the wait as the finished texture is really exciting.  The puffiness can be reduced with the introduction of other binders mixed into the puff binder.  A printing ink with 50% puff binder and 50% normal SF binder will result in a print that resembles sued.

The puff binder can also create puckering effects.   This is achieved by stretching the fabric taut, stretch lycras, velvets and fine organza’s work well.  Screen pint the puff, ensuring the ink sits on the surface of the fabric and will not pass through to the other side of the cloth.  Once the binder is dry heat-fix by the methods noted earlier.  The binder will puff up, pulling the fabric inwards and creating ridges and puckers.

Pearl Binder – Prepared silver pearlised binder, used with standard pigments and metallic powders.  Iron or bake to fix.

Opaque White – For printing onto dark coloured fabrics, can be reduced with standard sf binder.  Also pigments can be added to create pastel shades.  Iron or bake to fix.

Gloss Binder Lacquer – Mixed with the metallic glitter flakes and powders.  The binder dries transparently so only the glitter flakes and powders are visible.

Metallic Binder – Mixed with the metallic glitter flakes and powders. The binder dries transparently so only the glitter flakes and powders are visible.

Metallic and Pearl Powders – mixed at a rate of 10 – 15% with the various binders.  Care is needed to work fast as these powders dry quickly and block the screen.  Pigments can also be added to create coloured metallic shades.  Iron or bake to fix.

Uvisenz – a range of light sensitive coloured pigments giving reversible colour change by light.  When sunlight or UV radiation is applied, the molecular structure of the colourant changes and exhibits colour which is reversible.  It is possible to have a varying range by compounding with various binders, pigments and metallic powders.  Iron or bake to fix.

Retrospective Metallic and White – water based ink for producing highly reflective finishes when the print is exposed to a direct beam of light.  Pigments can be added to give a hint of colour.  Iron or bake to fix.  Care is needed to work fast as this ink dries quickly and blocks the screen.

Variotherm Colours - a range of heat sensitive colour matter containing substances which show thermochromism (change of colour at different temperatures).  At high temperature – low temperature the colour disappears and re-appears.  If the variotherm colours are blended with general pigments, a unique colour changing reaction can be obtained.  They can be added to various bases and/or colours, dependent on the desired effect.  Core at 150C for 4 minutes.

digital pattern.


Sunday 17 October 2010

discharge dye; print workshop notes.

 colour discharge (black silk) - clear discharge (black silk)

Discharge
The discharge technique makes it possible to put a white or coloured image onto a dark background.
A relatively simple technique that incorporates a reducing (bleaching) agent in the print paste.
The paste is printed, dried, steamed and washed. During the fixing (steaming) process the print paste bleaches out the dyed ground colour and replaces it with a white or cream colour. This mixture is known as white or clear discharge paste.
If coloured images are required an illuminating coloured discharge paste must be used. As with the white discharge paste, during the fixing (steaming) process the dyed ground colour is bleached out and replaced with the colour of the illuminating discharge paste.
Before printing the base cloth has to be dyed in an appropriate dischargeable dye. This will determine the success of the discharge print.
All dyes are dischargeable to a certain degree, while some dyes bleach out to a white, others, blues for example will change to a grey, turquoise or purple once steamed. Experimentation is needed to check for dischargeability.
White or illuminating pastes can be applied to the fabric in a variety of ways. The most common is screen printing, but block, stencil, mono and hand painting techniques are equally as good.
When using illuminating dyes for coloured discharge the basic principles of dyeing have to be taken into account, i.e. whether the dyes are suitable to the fibres of the cloth and observing that the correct fixing agents and processes are used.

Illuminating colour discharge dyes for silk wool and polyamide

Direct sky blue GD, yellow LFF
Acid yellow, red, violet, blue and black
Procion blues
Basic pink, yellow, blue, turquoise, flavine, orange
And most pigment dyes.
All of the Kemtex illuminating acid dye range - 13 colours

Illuminating colour discharge dyes for cellulose ( cotton, viscose, rayon & linen )

Most pigment dyes.
The pigment dyes produce crisp and brilliant colours and give the most consistent results from a relatively simple process.

Discharge is an exciting technique where fantastic finishes can be achieved. However it is a technique which is terribly inconsistent due to the following reasons.
-The strength, age, percentage and choice of reducing (bleaching) agent used.
-The type of printing auxiliaries and thickeners required.
-The length of time the discharge paste has been left before steaming.
-The humidity and condition of the steam.
-The type of dye used as the ground colour.
-The type of dye used as the illuminating colour discharge paste.
-The fabric used.

These inconsistencies more often than not enhances the overall finish of the cloth.
For consistent results experimentation must be carried out taking all of the above factors into consideration.
Good results are achieved when the paste is made, printed and steamed on the same day.

CLEAR DISCHARGE

400 ml WATER
35 - 25 gm MANUTEX F POWDER
1 tbsp GLYCEROL
100 ml BOILING WATER
50 gm FORMOSUL POWDER
Put 400 ml of water into the liquidiser, switch on and slowly add the 25 gm of manutex f powder to make a nice even thickener.
In a separate container mix together 100 ml boiling water, 1 tbsp of glycerol and 50 gm of formosul powder.
Add this mixture to the thickener and liquidise a few times until a lovely syrupy paste is made.
Leave to stand for 30 minutes
Apply the paste to a fabric dyed in a dischargeable dye. Better results are achieved when the paste penetrates the fibres of the cloth so it soaks through to the back of the fabric.
The print can dry naturally or it can be gently dried. Once dry, the fabric is steamed for 10 - 30 minutes for clean crisp colours.
Alternatively the discharge technique will work by ironing the print with the iron on its hottest setting. However this is a smelly experience and not really recommended. This method can also give the colours a brown tinge.
To wash out, run the fabric under the cold tap until the water runs clear. Then wash with a little detergent in luke warm water, making sure all the discharge paste is removed.
Finally rinse in cold water and dry.

DECROLINE DISCHARGE


100 gm SOLVITOSE POWDER
500 ml WATER
100 - 150 gm DECROLIN
50 gm GLYCEROL
200 ml WATER

Liquidise 100 gm of solvitose with 500 ml water.
Mix Glycerol and DECROLIN together to form a paste.
Add 200 ml water to paste and dissolve Decrolin.
Hand mix the paste into the solvitose mixture, then whiz a few times in the liquidiser.
This is an excellent strong paste, ideal as a white discharge paste but it can be to harsh as a base for illuminating colour discharge dyes.

Friday 15 October 2010

digital work development.

 from the tracing i have created from my norwich photographs, i have drawn a number of shapes to manipulate in photoshop to create digital drawings.


Wednesday 13 October 2010

procion dyes; print workshop notes.


 Dyeing Cotton or Linen with Procion H-E Dyes   

Procion is a manufactures name for a group of dyes known generically as reactive dyes. The dyes react with the fibre and the steaming process to produce vibrant fast colour on natural fabric and fibre.

When dyeing cotton or linen which have a very dense construction or are tightly woven the hot dyeing (80) Procion H-E dyes are recommended in preference to the cold dyeing (20-40) Procion MX dyes used more widely where there are no facilities for heating water. The hot dyeing temperature (80) makes dense tightly woven fabrics much more supple and it becomes easier for the dye to be applied evenly. Fabrics which may shrink should obviously be dyed using the cold dyes

Before starting the fabric should be scoured and weighed dry.

When you are dyeing cotton or linen with Procion there are two additions to the dye bath to assist the dyeing.

1) Common Salt: This allows the dye to move onto the fabric, without this the dye would remain in the dye bath.
2) Soda Ash: This fixes the dye to the fabric

Recipe

Weigh the dry fabric to calculate the ingredients for your dye bath

100grm of fabric should be dyed in 2-3 lts of water

To achieve a medium shade of colour for 100grm of fabric you will need:

1.0 -1.5grms of Procion H-E dye,
60grms of salt
8grms of Soda Ash

Safety precaution: Use the extractor unit for measuring and mixing powdered dyed. Use rubber gloves to protect skin.

Method

Measure out 2 litres of cold water in a suitable container (avoid iron, copper, or aluminum containers, these can affect the shade of the dye)

Weigh out salt add to pan and stir until dissolved

Weigh the  Procion H-E dye in the vacuum unit and dissolve in a little warm water. When fully dissolved add to the water and stir well

Add the scoured damp fabric and stir gently. Gradually raise the temperature to 80 over 15-20 mins

Once at 80 continue dyeing for 30 minutes by which time the dye will have taken or salted to the fabric

Weigh out the soda ash and dissolve in a cup of hot water and add to dye bath taking care it does not come into direct contact with the fabric

Maintain the temperature of the bath for a further 30 minutes to allow the dye to fix to the fabric or yarn.

Remove the fabric from the dye and rinse until the water runs clear, you can then wash in the washing machine

Monday 11 October 2010

tie dye.

this week we experimented with the dye baths through the process of the resist technique of tie dye. we had to prepare a variety of fabrics by manipulating them; stitching, pinning, tucking, glueing, tieing, knotting etc. to see what effect it would give when taken out the dye baths.

 crepe de chine dye
 silk dye
 cotton dye
cotton dye

norwich project sketchbook.

just a few images from my sketchbook. nothing special. my style of working has changed considerably over the last few weeks... i don't know if i like it or not.


from the shapes of the tracings i have developed these in photoshop to create a pattern;

Sunday 10 October 2010

devore; print workshop notes.


      silk viscose velvet - silk viscose satin


DEVORE

There are two main recognised methods of devore. They both rely on the basic construction of the cloth that is treated.

One mix of chemicals attacks protein fibres and the other destroys cellulose.

This technique is applied to mixed fibre cloths where one or more of the fibre types are destroyed, leaving an embossed effect with both solid and translucent areas.

Common devore fabrics available on the high street are silk viscose velvet and silk viscose satin which have been popular over the last few years.

There are many other fabrics specially designed for this technique which mostly rely on the cellulose fibres being destroyed.

However many exciting results can be produced on fabrics not designed for devore purposes and it is worth experimenting with unusual fabric combinations.

For successful effects it is important that there are different fibres present in both the warp and weft of the fabric or the cloth might fall apart.

If a cloth with a single fibre is used and printed with a careful selection of design, whole shapes can be burned away, producing a delicate frame work.

Where a devore resistant fibre is present in only the warp or weft, a floating thread technique can be created.

Once the basic principles of devore are understood, more adventurous work can be done with fabrics that have two or more devore resistant fibres. Multi layered effects can be produced by layering different fabrics together - cotton and wool, cotton and polyester or silk and viscose. The fabrics are then stitched or bonded together in places so it is possible to burn away areas of the top cloth, revealing the bottom cloth, thus creating a multiple cloth.

Interesting colour effects can be achieved by dyeing one or more fibre in a multi fibre cloth e.g. a polyester cotton coloured with a disperse dye will have a chalky look because the cotton has not taken up the dye. When the cotton is burnt out the full shade of the polyester will be revealed. This technique can be taken a stage further by cross dyeing the two fibres in contrasting dyes and colours.

Many complex colour patterns can be created by using various reactive and resist processes alongside the devore technique.

Many factors have to be considered when producing successful devore; the strength and amount of paste applied to the surface of the fabric ; how the paste is applied, screen printing is by far the best process as you can control the amount needed. Hand painting and block printing techniques can leave inconsistent results during the burn out stage ; the length of time the paste is heated, too long and too hot will damage the other fibres in the cloth, producing holes.


DEVORE FOR CELLULOSE FIBRES


This technique burns away all cellulose fibres - cotton, viscose and linen, but will not damage silk, wool and synthetic fibres.

The degradation of cellulose fibres are achieved by the use of an acid such as aluminium sulphate or sodium hydrogen sulphate. With the application of heat the paste forms an acid that carbonises the cellulose printed areas.


70gm solvitose powder

50gm aluminium sulphate

20gm tartaric acid

2tsp glycerol

400ml water

WARNING, THIS CREATES SULPHURIC ACID DURING PROCESSING

Dissolve the aluminium sulphate and tartaric acid in a little hot water. Mix into solvitose and add glycerine.

Put 10gm solvitose powder and 400ml water into liquidiser and whiz.

Add solvitose, aluminium sulphate mixture to the liquidiser and whiz.

Mix until a smooth syrupy mixture is achieved, leave the devore paste to stand for 30 minutes.


Screen print the paste onto the fabric making sure it penetrates the fabric, usually six or eight pulls for a medium fabric should be enough. When using silk viscose velvet always print on the reverse of the cloth rather than on top of the pile.

The fabric is dried before being heat treated. If the print is not completely dry during this process it will not get hot enough to carbonise and the results will be poor.

The fabric is then baked at 170C for 5 minutes or heat pressed at 170C for anything from 30 seconds to 2 minutes or ironed until the cellulose has carbonised, turning a brown - black colour. Experimentation is required at this stage.

The carbonised fibres are removed by gently rubbing the fabric in an open area - preferably outside. IT IS IMPORTANT AT THIS STAGE TO WEAR A MASK, GLOVES AND GOGGLES AS THE FIBRES AND CHEMICAL DUST ARE IRRITANTS.

Do not rub the fabric too hard as the fabric is brittle and holes are easily made.

The fabric can then be washed in warm soapy water until the burnt out areas are removed.

If a coloured fabric is wanted the fabric can be dyed before or after the burn out process.

DEVORE FOR PROTEIN FIBRES


This paste destroys protein fibres - silk and wool with a strong alkali, leaving cotton, viscose, linen and synthetics untouched.


400ml water

60gm solvitose powder

50gm sodium hydroxide pellets (caustic soda) dissolved in 100ml water.


WARNING: PLEASE TAKE THE NECESSARY SAFETY PRECAUTIONS WHEN PREPARING THIS RECIPE SINCE IT USES CAUSTIC SODA WHICH IS PARTICULARLY HAZARDOUS. ALWAYS USE EYE PROTECTION, LONG SLEEVES AND MASK. THEY ARE ESSENTIAL AT ALL STAGES OF THIS PROCESS TO AVOID ALKALI BURNS.

Add the granules to the cold water in a chemical resistant container and not the water to the granules. A great deal of heat and fumes are emitted at this stage. When cold add the caustic soda solution to the thickener. Mix into a smooth paste.

Follow the same steps as the cellulose devore recipe, printing,drying, carbonising and washing out. After washing, the alkali in the fabric is then neutralised in a solution of 2ml acetic acid per litre of water.

Another way to carbonise the protein fibres is to steam the print for ten minutes rather than heating it. This will cause the the caustic solution to destroy the protein fibres in the printed areas.

When using larger pieces of fabric, instead of heat pressing or baking, the fabric can be steamed. A stronger solution of caustic soda must be used for this method. Once the fabric is printed and dried it is steamed for 15 minutes until the protein fibres turn a yellow orange colour.

The cloth can be dyed before or after the devore process.

Monday 4 October 2010

potato stamping :)


it's amazing what you can achieve with a potato.

Friday 1 October 2010

first print workshop

wow. i've never done textile printing before, so i didn't realise it was so complicated and complex. different dyes for different fabrics, different fixers, screens, mesh etc.

i have to make a print dye file that will include research, samples, materials, fabrics, recipes and notes. this will then be a constant record that i can use to become familiar with all the different processes.

some initial notes from the print workshops;
- you must have the right fabric for the right dye.
- you get different effects from using different dyes.
- cellulose fabrics: cotton, linen, hemp, jute. (natural fibres)
- protein fabrics and fibres: wool, silk, mohair, angora, cashmere. (natural fibre - animal hair)
- semi natural fibres: voscose, rayon. (regenerated cellulose by chemical treatment)
- synthetic fabrics: polyester, nylon, acrylic. (oil based)
- you can cross dye by mixing fabrics and to see what effect this has.
- wear OLD CLOTHES and gloves!


Textile printing is the process of applying colour to fabric in definite patterns or designs. In properly printed fabrics the colour is bonded with the fiber, so as to resist washing and friction. Textile printing is related to dyeing but, whereas in dyeing proper the whole fabric is uniformly covered with one colour, in printing one or more colours are applied to it in certain parts only, and in sharply defined patterns.
In printing, wooden blocks, stencils, engraved plates, rollers, or silkscreens are used to place colours on the fabric. Colourants used in printing contain dyescapillary attraction beyond the limits of the pattern or design. thickened to prevent the colour from spreading by
Traditional textile printing techniques may be broadly categorised into four styles:
  • Direct printing, in which colourants containing dyes, thickeners, and the mordants or substances necessary for fixing the colour on the cloth are printed in the desired pattern.
  • The printing of a mordant in the desired pattern prior to dyeing cloth; the color adheres only where the mordant was printed.
  • Resist dyeing, in which a wax or other substance is printed onto fabric which is subsequently dyed. The waxed areas do not accept the dye, leaving uncoloured patterns against a coloured ground.
  • Discharge printing, in which a bleaching agent is printed onto previously dyed fabrics to remove some or all of the colour.
Resist and discharge techniques were particularly fashionable in the 19th century, as were combination techniques in which indigo resist was used to create blue backgrounds prior to block-printing of other colours. Most modern industrialised printing uses direct printing techniques.